
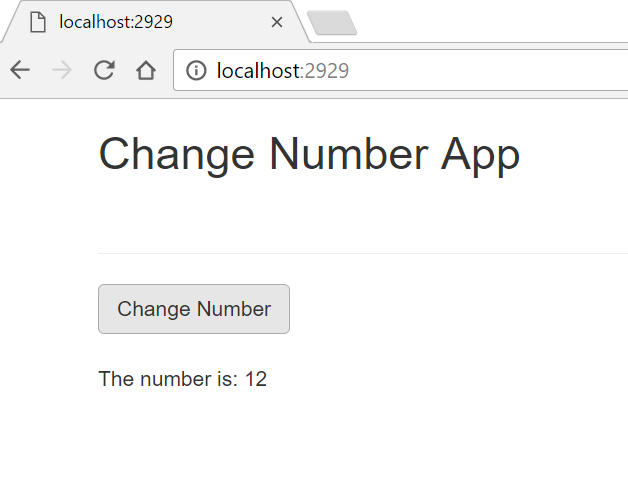
In this post, we are going to build a simple app using React and Redux. This app is going to perform a complex task (pun intended!) of changing the number that is already displayed. The final app will look something like the one shown in the image below, but I believe this will be a great example to start building apps with React.
You may refer to my previous article Getting started with Redux for some of the references.
If we were using only React and not Redux, the development of this application will be very simple. We might create two components one that will have the button to change the number and the other that actually displays the number. And our parent component will render both these components.
Let us name the component to display the number as DisplayNumber and the component that has the button to change the number as ChangeNumber and our parent component as App.
So our <App/> component will render the two components and the code may look something like this:
class App extends React.Component {
    constructor() {
        super();
        this.state = {
            number: "12"
        };
        this.changeNumber = this.changeNumber.bind(this);
    }

    changeNum(newNumber) {
        this.setState({
            number: newNumber
        });
    }

    render() {
        return (
            <div>
                <ChangeNumber changeNumber={this.changeNum}/>
                <DisplayNumber numberDisplayed={this.state.number}/>
            </div>
        );
    }
}
The App component has a constructor that holds the initial state, which is given as "12" to “number“. This state is passed as props to the <DisplayNumber/> Component and it displays this number.
The method changeNum is passed as props to the <ChangeNumber/> component. So when the button is clicked in the ChangeNumber component, it changes the state of “number” to the new number passed by the onClick function. The changeNum method takes an argument which will be the new number.
The <ChangeNumber> component will look like follows:
<button  className="btn btn-primary"
             onClick={() =>
                         this.props.changeNumber('25')}>
                         Change Number
</button>
Also, the <DisplayNumber/> component will be created as follows. It receives the number as props and displays it.
The number is: {this.props.number}
With Redux we will try to perform the similar function. But we won’t create a constructor in the App component to hold the state.
Table of Contents
Using Redux
You can use the officially supported create-react-app boilerplate to build this application.
To install Redux:
npm install redux --save
As mentioned in my earlier post, redux can be used independently without using react. So React is independent and Redux is independent. Therefore we need to bind React and Redux together. In order to do so, we will use the package react-redux.
npm install --save react-redux
Our directory structure should look something like this:
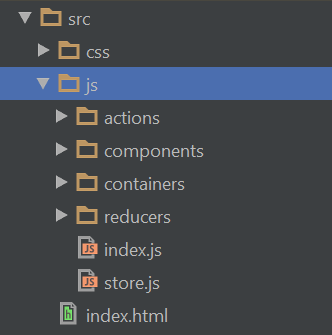
We will create the folders named "actions", "components", "containers", "reducer". We will store the stateless components inside the components folders and the smart components inside the containers.
Actions folder contains all the actions and the reducers folder contains all the reducers. Store of the application is created in the store.js file.
Our package.json with dependencies might look as follows after installing the redux and react-redux package:
"dependencies": {
  "babel": "^6.23.0",
  "babel-core": "^6.23.1",
  "babel-loader": "^6.4.0",
  "babel-preset-es2015": "^6.22.0",
  "babel-preset-react": "^6.23.0",
  "react": "^15.4.2",
  "react-dom": "^15.4.2",
  "react-redux": "^5.0.4",
  "redux": "^3.6.0",
  "webpack": "^2.2.1",
  "webpack-dev-server": "^2.4.1"
}
Creating components
As shown above, we will first create two components. One component will display the number and we will name it as displayNumber as before. So we will create a new JavaScript file called displayNumber.js inside the components folder. And we will create another component called changeNumber and similarly, we will create a JavaScript file inside the components folder.
Both these components are going to be stateless components as they are not going to deal with changing the state of the application directly. To know more about the stateless components you can refer to the video from Mindspace on YouTube.
As we will pass props as an argument to the function, we write props.numberDisplayed instead of this.props.numberDisplayed. Rest of the code for both the components will be same as shown above.
displayNumber.js
import React from "react";

export const displayNumber = (props) => {
    return (
        <div>
            <div className="row">
                <div className="col-xs-12">
                    <p>The number is: {props.numberDisplayed}</p>
                </div>
            </div>
        </div>
    );
}
changeNumber.js
import React from "react";

export const changeNumber =(props) => {
    return (
        <div>
            <div className="row">
                <div className="col-xs-12">
                    <button
                        className="btn btn-default"
                        onClick={() => props.changenumber('25')}>Change Number</button>
                </div>
            </div>
        </div>
    );
}
Next, we are going to create a app.js file inside the containers folder that will render both the displayNumber and changeNumber components.
We will begin by importing the above-created components as well as React and render method from the react and react-dom respectively.
App.js
import React from "react";
import {render} from "react-dom";

import {DisplayNumber} from '../components/DisplayNumber';
import {ChangeNumber}  from '../components/ChangeNumber';


class App extends React.Component {


    render() {
        return (
            <div className="container">

                <ChangeNumber  />
                <DisplayNumber />

            </div>
        );
    }
 }


}

export default App;
The image below is a visual demonstration showing that the button is rendered from <ChangeNumber> component and the number displayed is rendered from the <DisplayNumber> component.

Creating an Action
We will create an action named changeNum inside the file changeActions.js. The type of this action is “CHANGE_NUMBER” and the payload is passed as a number when the change number button is clicked in the ChangeNumber component.
export function changeNum(number) {
    return {
        type: "CHANGE_NUMBER",
        payload: number
    };
}
You can refer to my previous article on Getting started with Redux or the official documentation of Redux to know more about the Action. This article focusses on creating an Action.
Creating a Reducer
We will create a reducer changeReducer in the changeReducer.js file. In this reducer, we define the initial state as "12" and then as per the action performed we change the state. Note that we are not mutating the initial state. We are instead creating a new object called state and we are changing the value of the newly created object.
changeReducer.js
const changeReducer = (state = {
    number : '12'
}, action) => {
    switch (action.type) {
        case "SET_NAME":
            state = {
                ...state,
                number: action.payload
            };
            break;
    }
    return state;
}

export default changeReducer;
Creating a store
We begin by importing the method createStore from redux. We create the store by passing the reducer to the createStore method. Note I am using combineReducers here. This is to show how we can add multiple reducers in createStore method.
CreateStore method takes a single reducer, but there can be multiple reducers in an application.
store.js
import { createStore, combineReducers } from 'redux';

import change from './reducers/changeReducer';


export default createStore(
    combineReducers({
        change
    }),
    {}
);
Now, we are done with creating a store, actions, and reducers.
Updating the App.js
Now is the time to make some changes in the App.js file.
  import {connect}  from 'react-redux';

  import {changeNum} from '../actions/changeActions';


  class App extends React.Component {


      render() {

          return (
              <div className="container">

                  <ChangeNumber changeNumber={()=> this.props.changeNum('25')} />
                  <DisplayNumber numberDisplayed={this.props.change.number} />

              </div>
          );
      }
  }

  const mapStateToProps = (state) => {
      return {
          change: state.change
      }
  }

  const mapDispatchToProps = (dispatch) => {
      return {
            changeNum: (number) => {
                dispatch(changeNum(number));
          }
      }
  }

  export default connect(mapStateToProps, mapDispatchToProps)(App);
In the above code, we can see two new methods mapStateToProps and mapDispatchToProps.
Here, we need to tell redux which properties of the store’s state and actions we want to use in the components. This is done through these two methods: mapStateToProps and mapDispatchToProps.
mapStateToProps
mapStateToProps takes the store’s state as an argument which is provided by redux. It is used to link the component to certain part of store’s state. It returns a javascript object. Here key is the property name that can be used in the component. In this example we are going to use the property name “change” in our <DisplayNumber > component.
state.change implies that we are using the state from the changeReducer. This property can be then used in the component as props.
If we console.log(this.props.change) we can see the Object {number: "12}. As we have set the initial state or default state as 12 in the changeReducer.
Now since we want to display this number 12 in the displayNumber component, we pass this as props. Here we are passing it as numberDisplayed={this.props.change.number}

mapDispatchToProps
mapDispatchToProps Sets up the actions which we want to use in the component. It takes an argument and returns a javascript object, and value of this object is the action.
changeNum is the props name that is passed as a method where number is the argument which calls a dispatch method and it expects to get the same action definition which we have created in the actions with type and payload.
The store always updates itself if there is a change in the state. As we have set the initial state of the number in the changeReducer as 12, the number is initially displayed as 12. But once the change number button is clicked, it triggers the action and since we pass the number as 25, the reducer changes the state from 12 to 25. The stores updates this state of the application and as the <App/> component is always listening to the store, the change is reflected in the DisplayNumber component.
Connect
Connect connects React with Redux. It expects the above created two functions, mapStateToProps and mapDispatchToProps. And it then returns another function. This function then takes <App/> component here and we export this connect method as default.
Provider
If we were using just React, we would render the <App/> component directly. But in Redux will we have to use something called as <Provider>. We begin by importing Provider from react-redux.
The <Provider> makes the Redux store available to the connect() calls in the component hierarchy below. And we wrap the <App/> inside the <Provider>.
We cannot use connect() without wrapping a parent component, <App/> in our example, in <Provider>
Our index.js file will now look like:
import {render}  from 'react-dom';
import React from 'react';
import App from './containers/App';
import {Provider} from 'react-redux';

import store from './store';


render(
    <Provider store={store}>
        <App/>
    </Provider>,
    window.document.getElementById('root'))
That’s all we are done coding our first simple application using React and Redux. If we run our application, we can see the output as shown in the image below.